

Growing Micro Greens and Sprouts the Easy Way


 (10 votes, average: 3.50)
Growing your own sprouts and micro greens usually requires too much work and dedication. But not anymore! For the last couple of months, I’ve been trying the EasyGreen automatic sprouter and wheatgrass grower with excellent results. Even the most difficult seeds grow easily in the EasyGreen sprouter with very little effort.
For me the biggest problem has always been that I am not at home most of the day to do the necessary and tedious rinsing, shaking and draining required by the traditional sprouting method. With the EasyGreen, you just fill the water tank once a day and the automatic sprouter sprays clean water throughout the day and drains it without you doing anything!
Cleaning and maintenance is also very easy and requires very little time. The EasyGreen automatic sprouters can also be 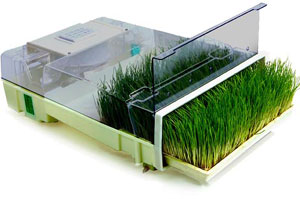 stacked to increase production. This is ideal for commercial applications. There is also an optional automatic water filling system so you don't have to refill the water tank every day. This is ideal when leaving home for a few days.
Having fresh sprouts and micro greens in the kitchen is very convenient. They can add flavor, color, and crunch to almost any dish and are great for garnishes and creative presentations. It is also a lot of fun to experiment with different seed combinations and come up with the perfect tasting salad mix.
Difference Between Micro Greens and Sprouts
Micro Greens are small edible greens produced from the same seeds that are used for full sized vegetables, herbs or other plants that are harvested before they fully develop. Commonly grown varieties of micro greens are amaranth, arugula, beets, basil, cabbage, celery, chard, chervil, cilantro, fennel, kale, mustard, parsley, radish, and sorrel. Micro greens usually have intense flavors considering their small size.
Micro greens are planted and grown in soil (best option for seeds such as sunflower, buckwheat and cilantro) or a soil substitute such as peat moss, sponges, fine-textured fabrics or other fibrous materials (best option for seeds such as radish, cabbage, kohlrabi and basil). They grow best in high light conditions, low humidity and good air circulation. The seeds are planted with some distance between them so the plant has space to grow and develop. Most varieties of micro greens take 1 or 2 weeks to develop but some can take up to 6 weeks. After the leaves are fully expanded, the micro greens are ready for harvest. They are cut above the soil surface without any roots.

Several micro green seeds form gelatin sacks around them. This type of seeds, called mucilaginous, usually don’t grow well in a conventional sprouter. Some people have had success with growing mucilaginous micro greens in the EasyGreen sprouter by making a few modifications: seeding the seeds on nylon stocking or a grow mat, adjusting the timer so it mists less often, removing the door to increase air circulation and placing the machine in a well lit area but no direct sunlight. I’ll be experimenting in the next few weeks and will let you know the results!
Sprouts are simply germinated seeds but in this case what is eaten consists of the seed, root, stem and pale, underdeveloped leaves. Commonly grown varieties of sprouts are alfalfa, sunflower, cress, lentil, and buckwheat. Sprouts are produced in water and the seeds are placed with high density in the sprouting equipment or enclosed container. The sprouting process is done in high moisture and low light conditions. The seeds are usually soaked for one day and then rinsed in water several times a day for a few days until they are ready. Most sprouts are usually harvested in 3 to 5 days, much faster than most micro greens.
The EasyGreen Automatic Sprouter
What’s Included
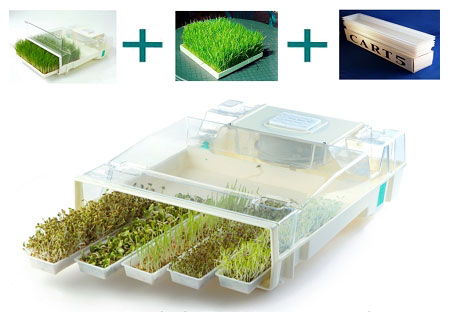 1 x EasyGreen sprouter
1 x Mist Generator 110v/60Hz
1 x 96 Activation Timer 110v/60Hz
5 x Food Grade Quality Plastic Cartridges
1x Food Grade Large Plastic Tray
1 x Drainage Tube 1 x Sliding Door
1 x Owner's Manual CD
The EasyGreen sprouter machine is a fairly large plastic container of about 18" X 22" X 8". The top is made of clear plastic to let some light in. The unit has a mist generator and a water tank which holds about 1 gallon of water and lasts about 1 day in normal conditions. In the compartment you can fit 5 cartridges or 1 large plastic tray.
How It Works
The EasyGreen automatic sprouter needs to be placed on a flat surface near a power outlet and a sink to discharge the used water. Placing it near a sink is convenient but not necessary as the equipment has a water tank reservoir and the used water can be discharged into any container (I used a water gallon). You can put several EasyGreen sprouters on top of each other for growing sprouts or wheatgrass.
The timer provided connects to the power outlet and the unit and can be fully programmed to activate the mist generator at different times of the day for different intervals. The manufacturer recommends setting up the timer for 7:00am, 10:00am, 1:00pm, 4:00pm, 7:00pm, 10:00pm and 2:00am in normal weather conditions. Each time, the mist generator is activated for 15 minutes. The timer schedule can be adjusted for dry or humid weathers.
Daily, you need to fill the water tank and empty the container of used water if you are not discharging directly in a sink. You then need to turn all the trays in the machine and add one more tray if you want to have fresh sprouts every day. The sprouting machine will do the rest!
Maintenance
Each week you have to disinfect the EasyGreen. You need to remove the trays, wipe the compartment to remove any left seeds or sprouts, fill the water compartment with 4 tbsp of bleach (or peroxide) and let the mister run for 2-3 hours. Then you have to add an additional 2 liters of water and let it run until the water tank is empty. This minimizes the risk of contamination.
The air filter needs to be changed every 2-3 months depending on dust. Then 3 times a year a periodic cleaning is required. You unscrew the mist generator and clean the impeller shaft holes. The manufacturer recommends scrubbing the machine inside and out preferably in the bathtub.
This is the part I really don’t like. If you intend on stopping the use of the machine for 2 days or more, which happens every time we travel, the water vapor accumulated in the mist generator area may lead to rust and malfunctioning. You need to empty the water from the tank, remove the air filter and using a hair dryer, blow hot air thru the air intake area for about 3 minutes. My unit didn't have this but you can purchase the optional automated water filling system to solve this problem. This item consists of a float valve installed in the water compartment of the EasyGreen and can be connected to any faucet. The machine will fill up water automatically.
Conclusions
I wouldn’t say the EasyGreen automatic sprouter is set it and forget it but it requires very little effort and the results are really good. At about $200, it is significantly more expensive than the traditional buckets and jars used for growing sprouts but it saves a lot of time, you can grow almost anything with good results and it reduces the risks of contamination if used properly.
Recipes by Kit
Recipes by Category
As Seen In