

Basic or Direct Spherification


 (9 votes, average: 3.67)
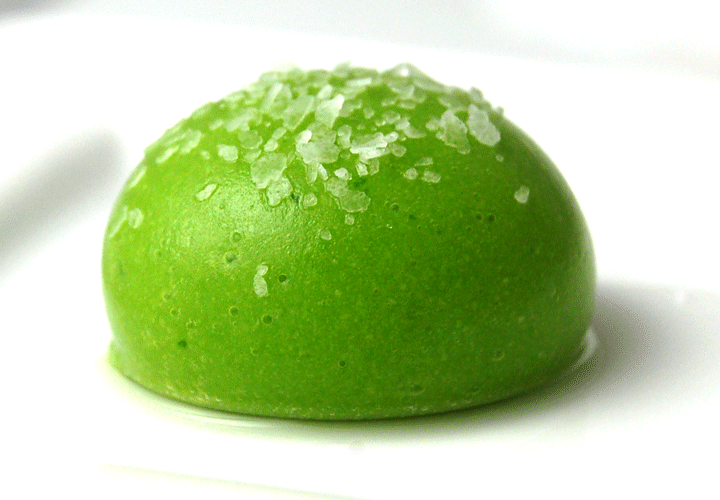
The Basic Spherification technique, also called Direct Spherification, consists of submerging a liquid with sodium alginate in a bath of calcium to form a sphere. Watch video below!
Pros of Basic Spherification
- This technique is ideal for obtaining spheres with a very, very thin membrane that is almost imperceptible in your mouth and easily "explodes" as if there is no solid substance between your palate and the liquid.
- The gel membrane is formed inside the sphere using the flavored ingredient so there is no flavorless gel surrounding the sphere like in Reverse Spherification. This results in a better eating experience.
- It is easier to get a perfect sphere on the plate with Basic Spherification than with Reverse Spherification. Even if the resulting product is not a perfect sphere it will most likely look as one once you plate it as the subtle and flexible membrane will adapt and reshape when the quasi-sphere is placed on the plate. (for optimal results read "10 Tips to Create a Perfect Sphere")
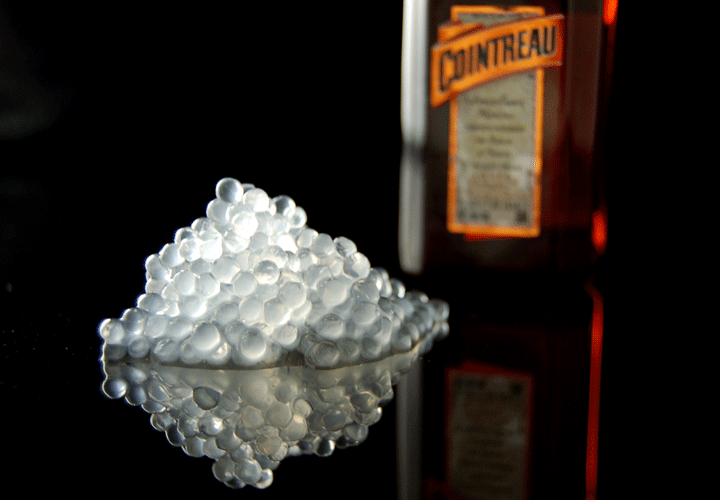
-This is the preferred spherification method for producing “caviar” (small spheres) since the viscosity of the bath is thin allowing the small droplets to cohere into a spherical shape in the bath and the spheres don’t stick together as in reverse spherification. (for optimal results read "7 Tips for Making Spherification Caviar")
- There is no need to let the calcium bath rest for 12-24 hours before using it to obtain optimal results. This allows you to start and finish the preparation within an hour. In Reverse Spherification the sodium alginate bath needs to rest in the fridge for several hours to eliminate the air bubbles created by the process of dissolving the sodium alginate with the immersion blender.
Cons of Basic Spherification
- Needs to be served immediately and cannot be stored. Once the sphere is removed from the sodium alginate bath, the process of jellification continues even after rinsing the sphere with water and it will convert into a compact gel ball with no magical liquid inside.
- Jellification does not occur if the liquid acidity is high (PH<3.6) but this can be corrected by adding an alkaline ingredient such as sodium citrate to the liquid to reduce the acidity level before the spherification process (read below how).
- Basic Spherification cannot be used with ingredients that have calcium content as it will react with the sodium alginate and gel before you pour the flavored ingredient in the calcium bath. If calcium content not too high it can be fixed, read below how.
- The consistency of the liquid inside the sphere is made a little gummy by the addition of sodium alginate. The good thing is that sodium alginate has no discernable flavor so it just increases the viscosity.
- You may need to rest in the fridge for several hours the flavorful liquid to eliminate the air bubbles created by the process of dissolving the sodium alginate with the immersion blender. Below are some tips to speed up the process.
- The delicacy of the resulting subtle membrane with the Basic Spherification process reduces the versatility of the resulting product. Any slight pressure will break them so they need to be manipulated carefully and they cannot be used as fillings in mousses or sponge cakes for example.
Preparing the Flavored Liquid for Basic Spherification
Dispersing and Hydrating Sodium Alginate
To produce Basic Spherification, you need a solution with 0.5% sodium alginate (0.5 g per 100 g of flavored liquid). Sodium Alginate, like most hydrocolloids, needs to be dispersed in the liquid and hydrated before it can gel in presence of calcium ions. This can simply be done by mixing the sodium alginate with an immersion blender or regular blender but you need to know a few things first to be successful:
- Liquid needs to be cold or otherwise the sodium alginate may hydrate and gel before it can get dispersed, resulting in gel lumps.
- To facilitate dispersion you can pre-mix dry sodium alginate with another powder ingredient such as sugar.
- Acidity of liquid cannot be high or the sodium alginate will transform into algenic acid which prevents hydration and thickens the liquid. PH of liquid needs to be above 3.6. Adjust the PH if necessary before adding sodium alginate.
- Liquid cannot contain free calcium ions as it will gel as they react with the sodium alginate before you can make the spheres in the calcium bath. Use a sequestrant to bind the free calcium ions so they are not available to react with the sodium alginate.
- Sodium alginate cannot hydrate well in alcohol, so disperse and hydrate in water or flavored liquid with high water content first.
Liquids with Watery Density (e.g. melon cantaloupe juice)
Add the amount of sodium alginate indicated in the recipe to 1/3 of the main ingredient and blend with an immersion blender until the sodium alginate is dispersed. Keep in mind that the sodium alginate will become sticky when it comes in contact with the liquid and it may take several minutes until it is completely dispersed and hydrated. Then add the remaining main ingredient liquid and let it rest in the fridge for 1 hour to eliminate the air bubbles created by the immersion blender. This last step is not only for aesthetics but will also make the droplet less buoyant in the bath and allow it to sink and be completely covered by the calcium bath.
Thick Liquids (e.g. mango puree)
In this preparation, distilled water with no calcium content is added to the main ingredient to obtain the right consistency for spherification. Do not use tap water since it usually contains calcium. Add the amount of sodium alginate indicated in the recipe to the water used to correct the main ingredient density and blend with an immersion blender until the sodium alginate is dispersed like explained in the previous process. Then add the main ingredient and let it rest in the fridge for 1 hour to eliminate the air bubbles created by the immersion blender.
Correcting Acidity for Basic Spherification
The Basic Spherification process does not work if the main ingredient is too acidic (PH<3.6) as we mentioned before. If necessary, the acidity can be reduced by adding an alkali such as sodium citrate to the main ingredient (if watery liquid) or the water used to reduce the main ingredient density (if thick liquid) always BEFORE you add the sodium alginate.
However, sodium citrate has a sour taste as well as a salty taste so adding too much of it will change the flavor of the liquid in the sphere. Add small amounts of sodium until you achieve a PH >3.6 by measuring with PH Indicator Paper or a PH meter. Sodium citrate and PH Indicator Paper are included in the Molecular Gastronomy Essentials Kit, the Molecular Gastronomy Premium Kit and the Molecular Gastronomy Ultimate Kit.
Correcting Free Calcium Content for Basic Spherification
Basic Spherification cannot be used with ingredients that have calcium content (free calcium ions) as it will react with the sodium alginate and gel before you pour the flavored ingredient in the calcium bath. If the calcium content is not too high, you can add a sequestrant such as sodium citrate to the flavored liquid if the PH is above 4.5 before mixing with the sodium alginate. The sodium citrate will bind to the free calcium ions so they are not available to react with the sodium alginate. If you have an ingredient with calcium content, it is better to use Reverse Spherification.
Removing Air Bubbles
Mixing sodium alginate with any liquid usually results in many air bubbles trapped in the resulting dense liquid. Air bubbles are a problem because they may create weak points in the sphere membrane that will break or leak easily. Also, air bubbles will increase the buoyancy of the sphere in the bath, making it float and not allowing it to sink and be completely covered by the calcium bath. Finally, it will affect the presentation, making the color of the flavorful liquid pale.
Here are a few ways to eliminate the air bubbles:
-Let it rest: this is the most common method. Just let the solution with sodium alginate rest in the fridge. Depending on the density of the liquid, this may take 1 to 24 hours.
-Pass it through a fine sieve: to speed up the process, you can pass the sodium alginate solution through a fine sieve. Let the liquid flow through it on its own without applying pressure. You may have to repeat this process a few times.
-Use a vacuum chamber: these are expensive but if you have access to one, you can place the liquid in the vacuum chamber to eliminate the air bubbles. This is definitely the fastest method.
-Using a magnetic stirrer instead of a blender will prevent the formation of air bubbles.
Preparing the Calcium Bath for Basic Spherification
While you wait for the main ingredient to settle in the fridge, prepare the calcium bath by dissolving the calcium salt in a bowl to obtain a solution with 0.18% calcium. Keep in mind that different calcium salts contain different amounts of calcium ions and therefore the amount you use to create the calcium bath will be different too. The most common calcium salts used in spherification and the concentrations to create the calcium bath are:
| Calcium Salt | Calcium Content | Qty to Make 0.18% Ca solution |
| Calcium Chloride | 36.1% | 0.5% |
| Calcium Lactate | 18.4% | 1% |
| Calcium Lactate Gluconate | 9.3% | 2% |
-0.5% Calcium Chloride: this is the preferred calcium salt to create the bath for Basic Spherification. Use 0.5 g per 100 g of water to create a 0.5% solution of Calcium Chloride. You can just stir it since the Calcium Chloride dissolves very easily in water. Calcium Chloride has a bad salty flavor but you can rinse it off with water. Calcium Chloride is very hygroscopic (absorbs water in the air quickly) so close the container quickly, store it in a dry place and consider using a desiccant packet if the humidity in the air is high. Calcium Chloride is included in the Molecular Gastronomy Essentials Kit, the Molecular Gastronomy Premium Kit and the Molecular Gastronomy Ultimate Kit.
-1% Calcium Lactate: mostly used for Reverse Spherification because it has better flavor. Use 1 g per 100 g of water to create a 1% solution of Calcium Lactate. You can stir it or mix with a blender.
-2% Calcium Lactate Gluconate: the preferred calcium salt for Reverse Spherification because it has no discernible flavor. Use 2 g per 100 g of water to create a 2% solution of Calcium Lactate. You can stir it or mix with a blender. Calcium Lactate Gluconate is included in the Molecular Gastronomy Essentials Kit, the Molecular Gastronomy Premium Kit and the Molecular Gastronomy Ultimate Kit.
Increasing the Calcium Bath Density
To aid the formation of spherical shapes when you pour the alginate solution into the bath, you can increase the density of the bath to prevent the spheres from flattening at the bottom of the container. You can achieve this by adding sugar to the calcium bath up to 20%.
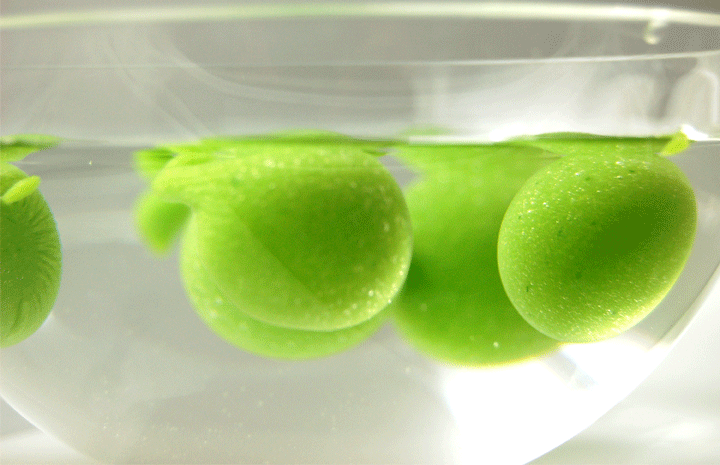
Creating the Spheres in the Calcium bath
1-Get the flavored liquid with sodium alginate from the fridge, the calcium bath and the measuring spoons (if making large spheres to resemble ravioli, gnocchi, etc.) or syringe / Caviar Maker (if making small spheres to resemble caviar). The measuring spoons and syringe are included in the Molecular Gastronomy Essentials Kit, the Molecular Gastronomy Premium Kit and the Molecular Gastronomy Ultimate Kit.
2-Prepare another bowl with plain water that you are going to use later for rinsing the spheres to remove the excess of calcium chloride.
3-Now grab the syringe, Caviar Maker or the measuring spoon of the desired size; fill them with the flavored liquid and carefully pour it in the calcium bath. If using a syringe or the Caviar Maker, create droplets by placing them about 3 inches above the bath surface. If using a spoon, wipe the bottom with a paper towel, place the spoon over the bath slightly touching its surface and flip it to pour the liquid into the calcium bath.
4-Stir the bath gently with the slotted spoon without touching the spheres. If you let them sit in the bottom of the bath, they will flatten and if you let them float, the top won't be covered with the calcium solution and won't gel.
5-If making caviar wait for about a minute and if making large spheres wait for about 2 minutes. The longer you wait the thicker the gel that will form. In general, for a good eating experience, you want the gel layer surrounding the sphere to be as thin as possible but it also needs to be strong enough to hold the shape and allow for careful handling. If the membrane is too fragile, they may easily break when you remove them from the bath or place them on the serving spoon.
6-Carefully remove the sphere from the calcium bath using a slotted spoon and rinse it in the bowl with clean water. The special slotted spoon is included in the Molecular Gastronomy Essentials Kit, the Molecular Gastronomy Premium Kit and the Molecular Gastronomy Ultimate Kit.
TIPS: I recommend you always start with one sphere first to adjust the pouring process and the time in the calcium bath. If the sphere membrane is too subtle and the sphere easily breaks when handling it with the slotted spoon carefully or when plating it, extend the time in the calcium bath until you get the desired strength. Keep in mind that the thinner the membrane the better experience people are going to have when eating it.
Remember that the spheres made with the Basic Spherification technique need to be served immediately or they will eventually convert into a compact gel ball since the spherification process continues even after removing it from the calcium bath.
Recipes by Kit
Recipes by Category
As Seen In